Teaching Audio Electronics during COVID: Inventiveness and Opportunities
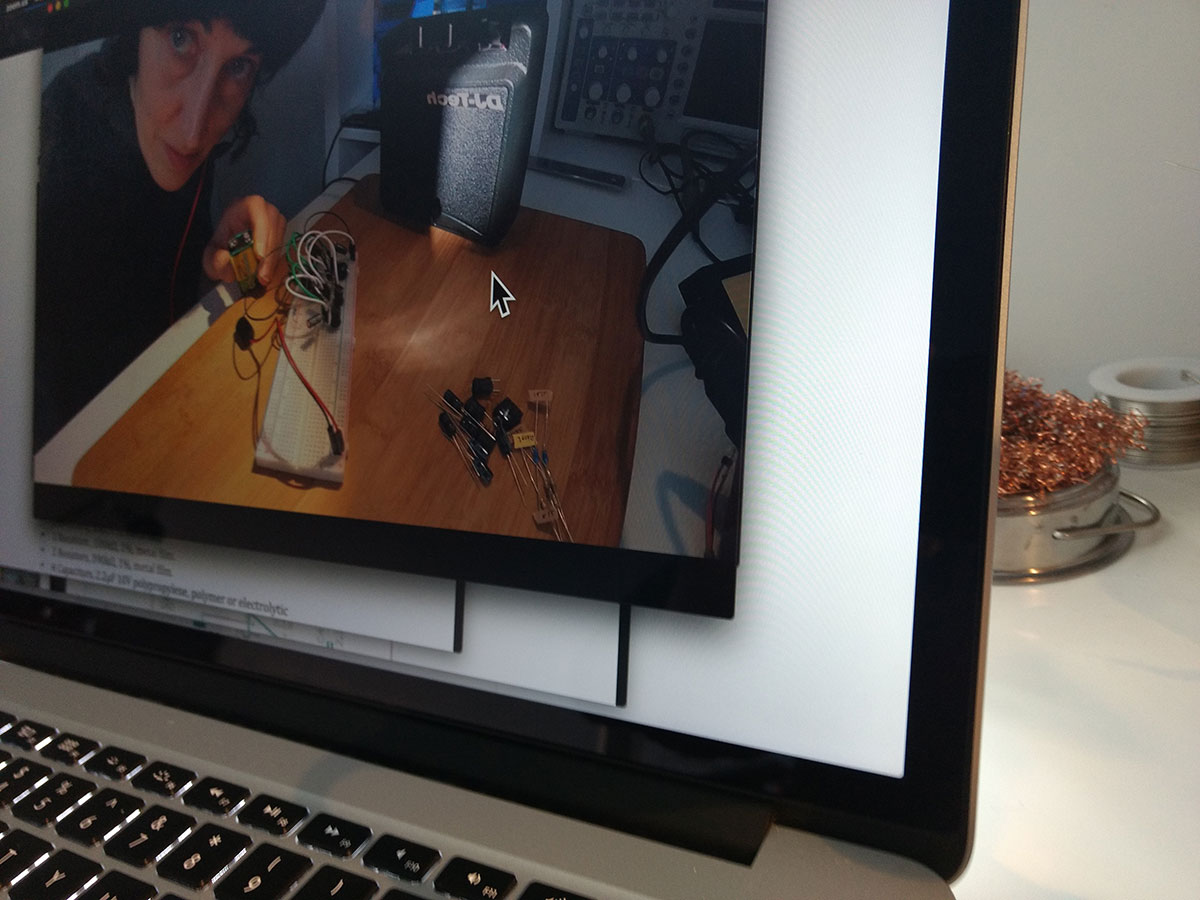
This semester I have been teaching for the second time the module TECH3011 Studio Technology: Audio Electronics at De Montfort University (DMU), which is a third-year undergraduate course in audio electronics that includes lectures and laboratories for 12 weeks in the Spring semester. The main difference with last year is that this time, due to the continued pandemic situation, it had to be delivered fully online (Figure 1), whilst last year we moved online during the last few weeks of the module.
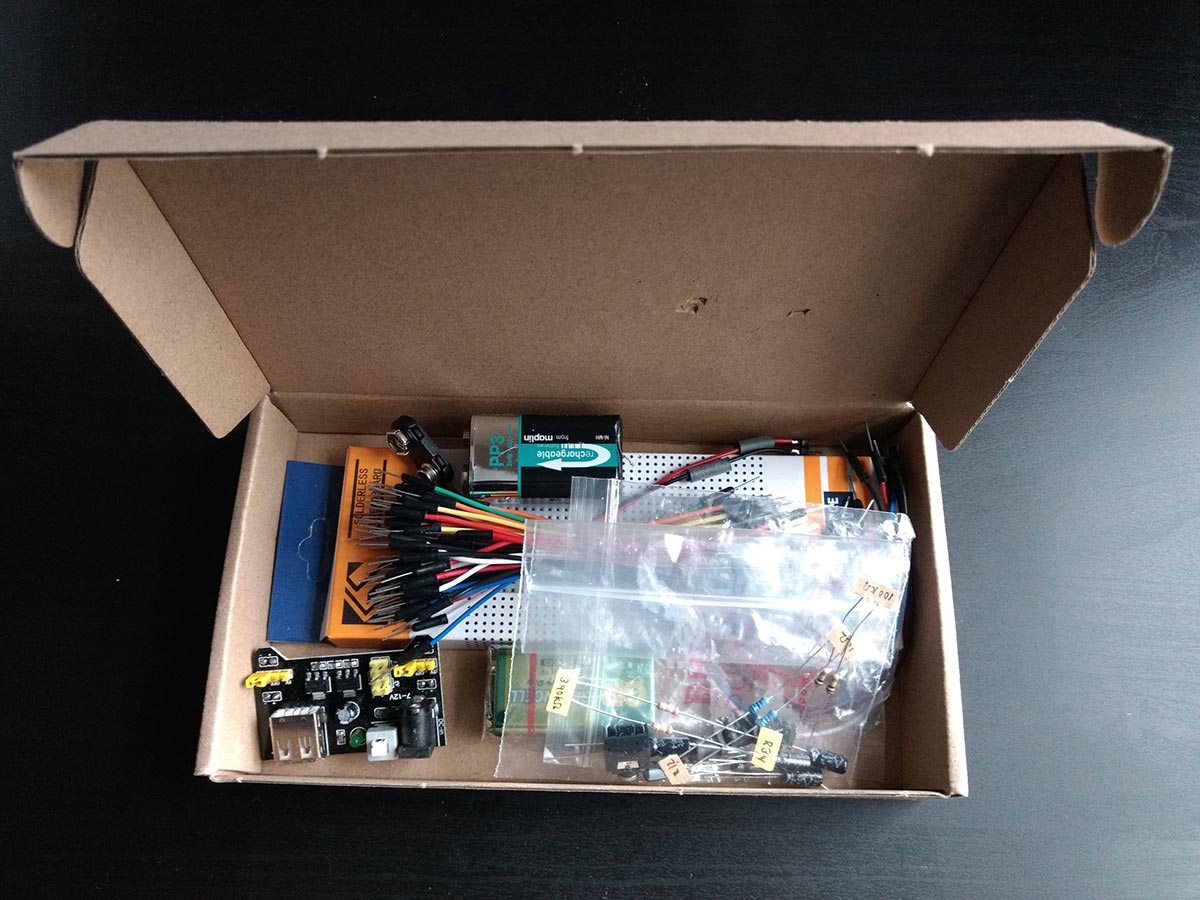
New additions of this year’s online edition have included (1) blogging as an optional activity using the module’s blog, (2) posting to students’ homes a prepared electronic kit based on the DIY Elektroslush device, which included a breadboard instead of a perfboard for safety reasons (Figure 2), and (3) using the professional circuit simulator software OrCAD for the final assignment on audio equipment testing, which was accessible online using a virtual machine from Your DMULabs, instead of using the LINDOS MiniSonic MS20 hardware device and related software.
Online Teaching
At DMU, our online teaching and learning platform is Blackboard where we post all the module’s content, including videos recorded using DMUReplay (Panopto) and, at the time of this writing, we use the real-time online communication tool Blackboard Collaborate for online meetings. Online teaching has meant to deliver the lectures offline by offering weekly videos that the students can watch at their pace and time following the flipped classroom model. This has been combined with weekly online labs with a mix of theoretical and hands-on exercises using both hardware and software. The online labs have been the most challenging part, and, at the same time, the most rewarding.
This blog post is about delivering online labs on audio electronics, lessons learned and practices that can be interesting to continue once we are back on campus.
The Online Labs: The Protocol
Following last year’s protocol, each weekly lab has a worksheet that details the activity of the session, including the aim of the lab, contextual information, and exercises that the students are invited to solve. The solutions of each lab session are typically posted online on Blackboard after the lab session.
This year the module had 17 registered students, so we divided the labs into 2 groups. Each lab has a duration of 2 hours. A common workflow has been to have two main activities in each lab, allocated to one hour each. For each of these activities, we typically start discussing the theoretical concepts behind it. Then, the students are divided into teams, randomly assigned, which are distributed in breakout rooms to work with the exercises. During this time, I visit the teams in case there are questions. Finally, we meet in the plenary, where one of the groups shares the solutions of the exercises using the online shared whiteboard or sharing their screens while the results are discussed in the group, where my role is to be a facilitator.
The meeting points in the plenary using the whiteboard can be seen as checkpoints, which are necessary to make sure everyone is on the same page. At the end of each lab session, if there’s time, the students are invited to write a short blog post about something they have learned in the session.
Theoretical Labs: Handwritten Concepts
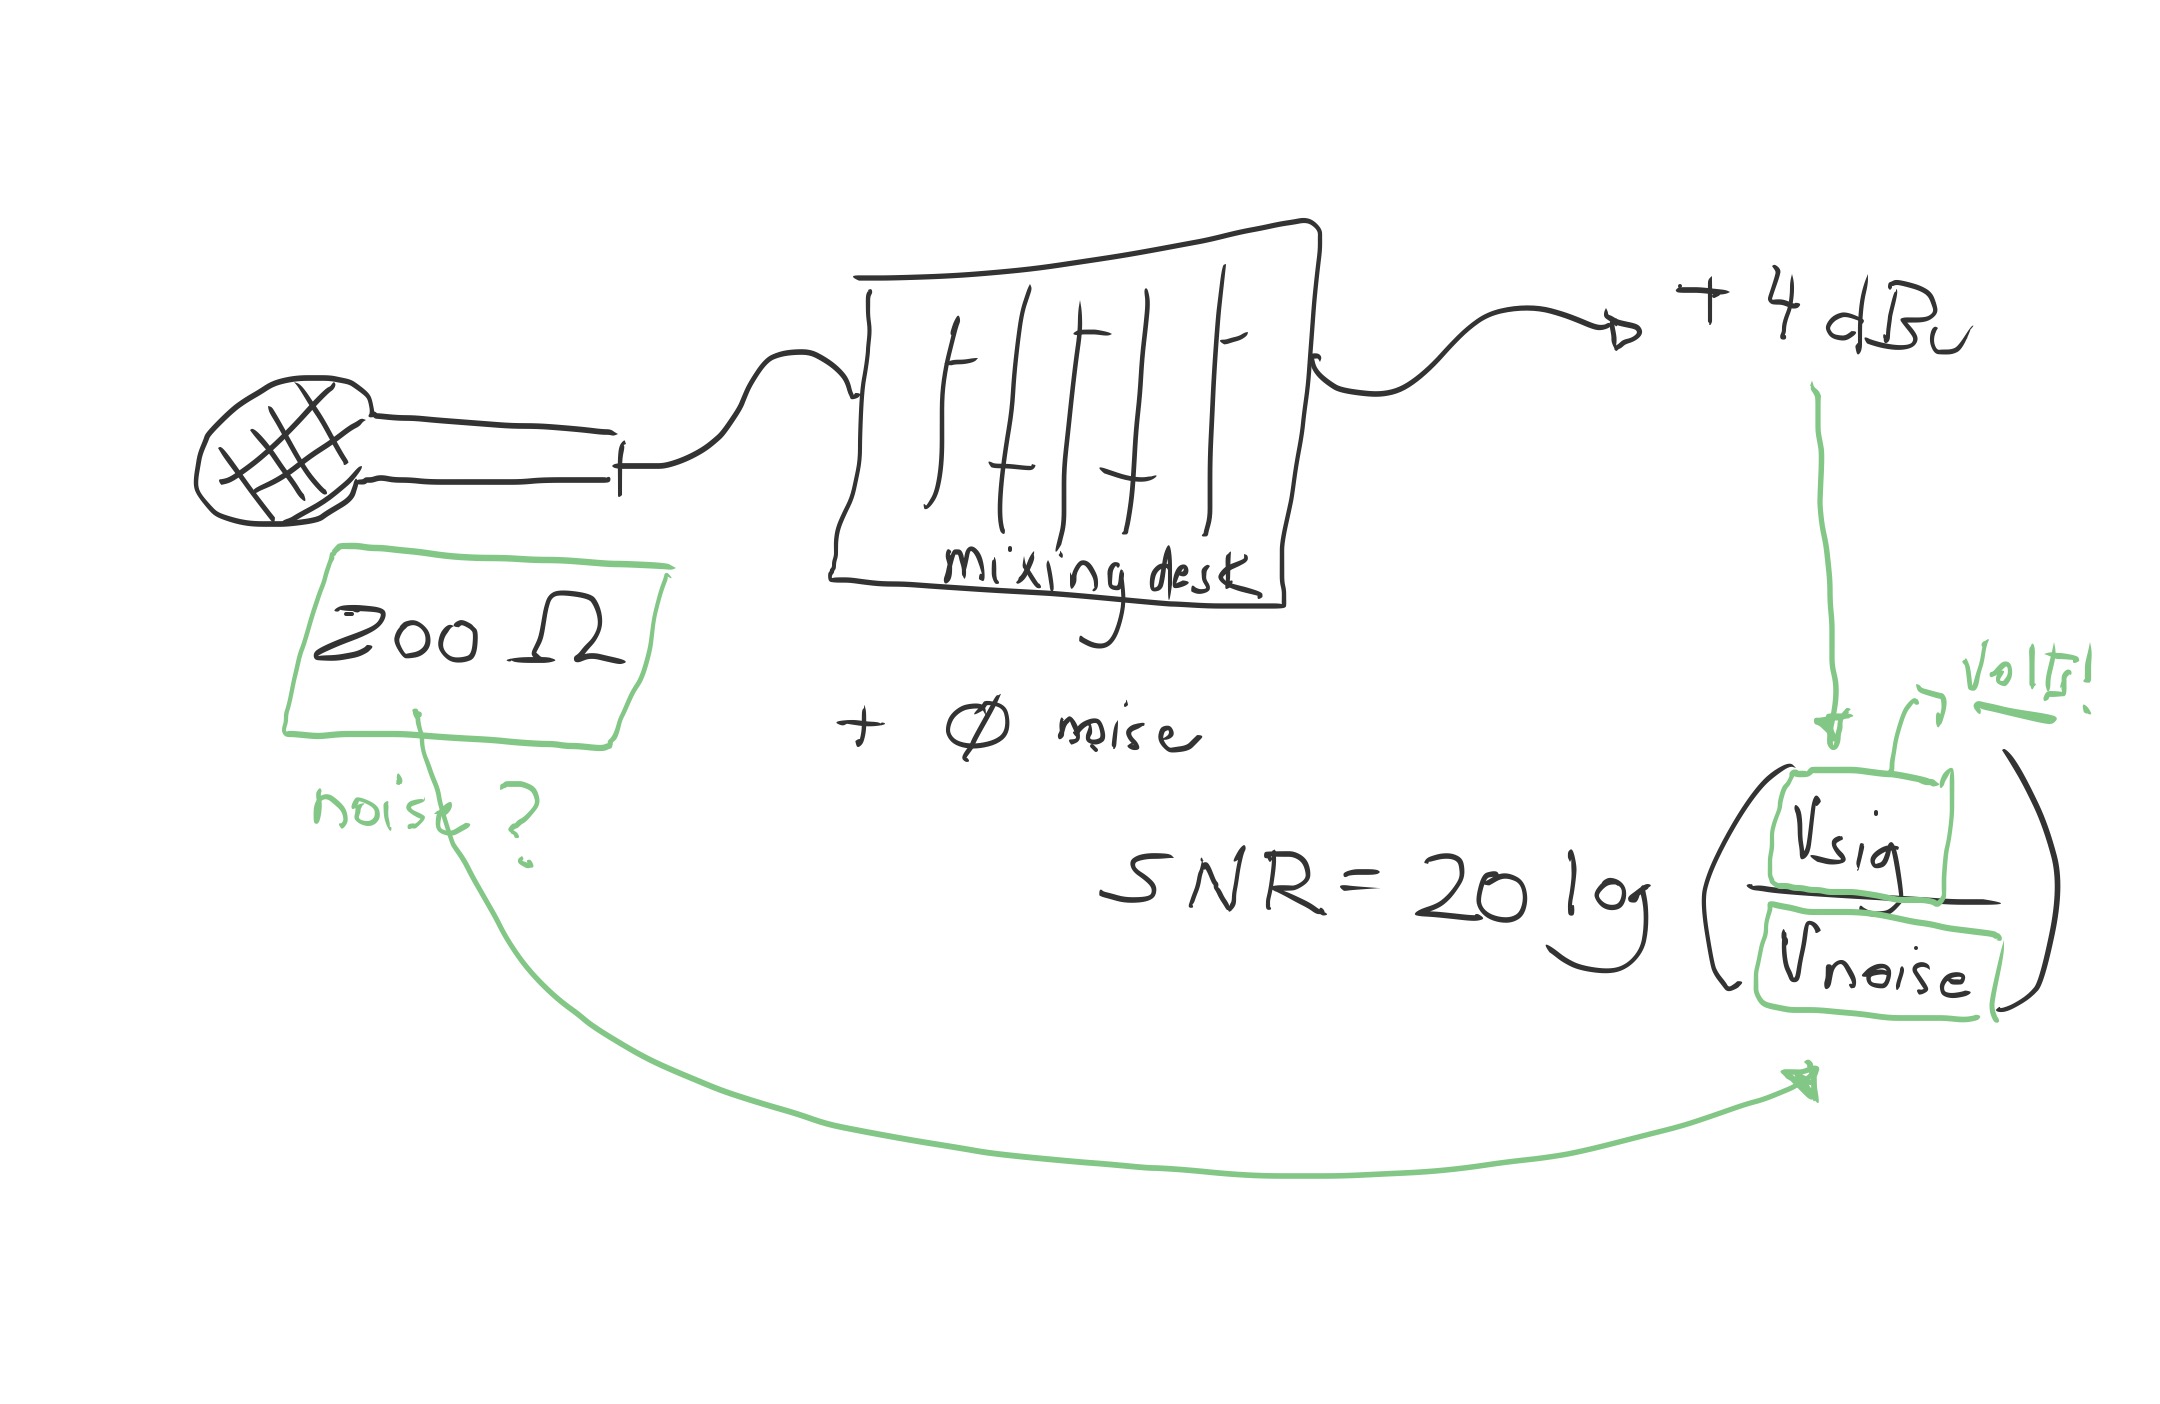
During 3 weeks, we covered theoretical content, such as decibels, filters, noise, interfaces and impedances. This is based on the problem-solution model. In class, I would explain the concepts on a blackboard/whiteboard to then let the students solve the problem. For the online delivery, I needed to replicate the blackboard/whiteboard experience to share common concepts and explain the problems. Moving this approach online has its advantages. Apart from the shareable online whiteboard available on Blackboard Collaborate that is accessible and “editable” by all, it is possible to save digital copies easily that can be shared with the students. However, the use of a tablet by the instructor is recommended to achieve fine writing and drawing (Figure 3).
The main teacher’s and student’s setup is listed next.
Teacher’s Setup
- Headset
- Computer with Blackboard Collaborate
- iPad/tablet connected to Blackboard Collaborate (in my case via Zoom)
- Zoom connected to Blackboard Collaborate (optional in case you can’t share directly the tablet screen on Blackboard Collaborate)
- Lab worksheet
Student’s Setup
- Headset
- Computer with Blackboard Collaborate
- Webcam (optional)
- Lab worksheet
Hands-on Labs: Electronic Kits
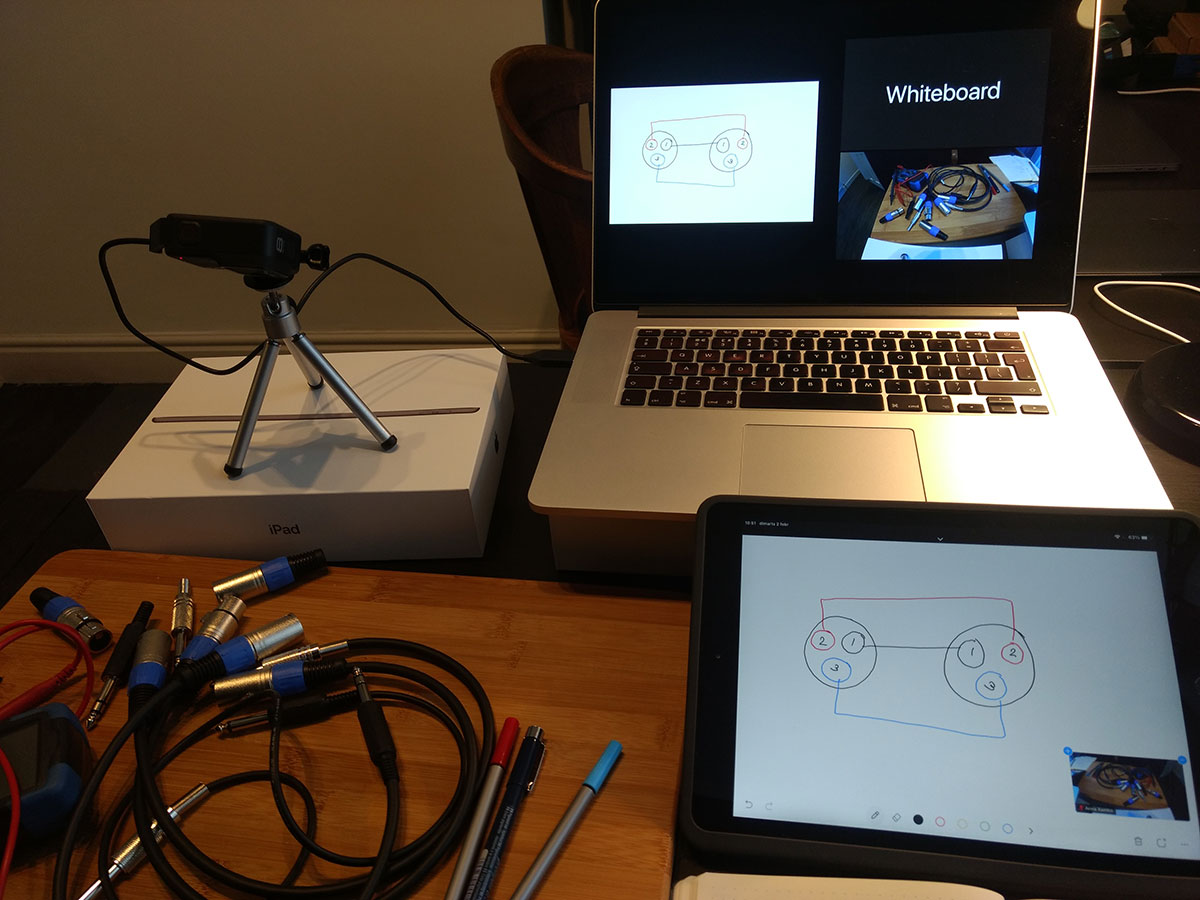
During three weeks, we covered hands-on exercises related to physical computing. This is based on the hands-on practice-based model using hardware. One week we discussed cable making (Figure 4).
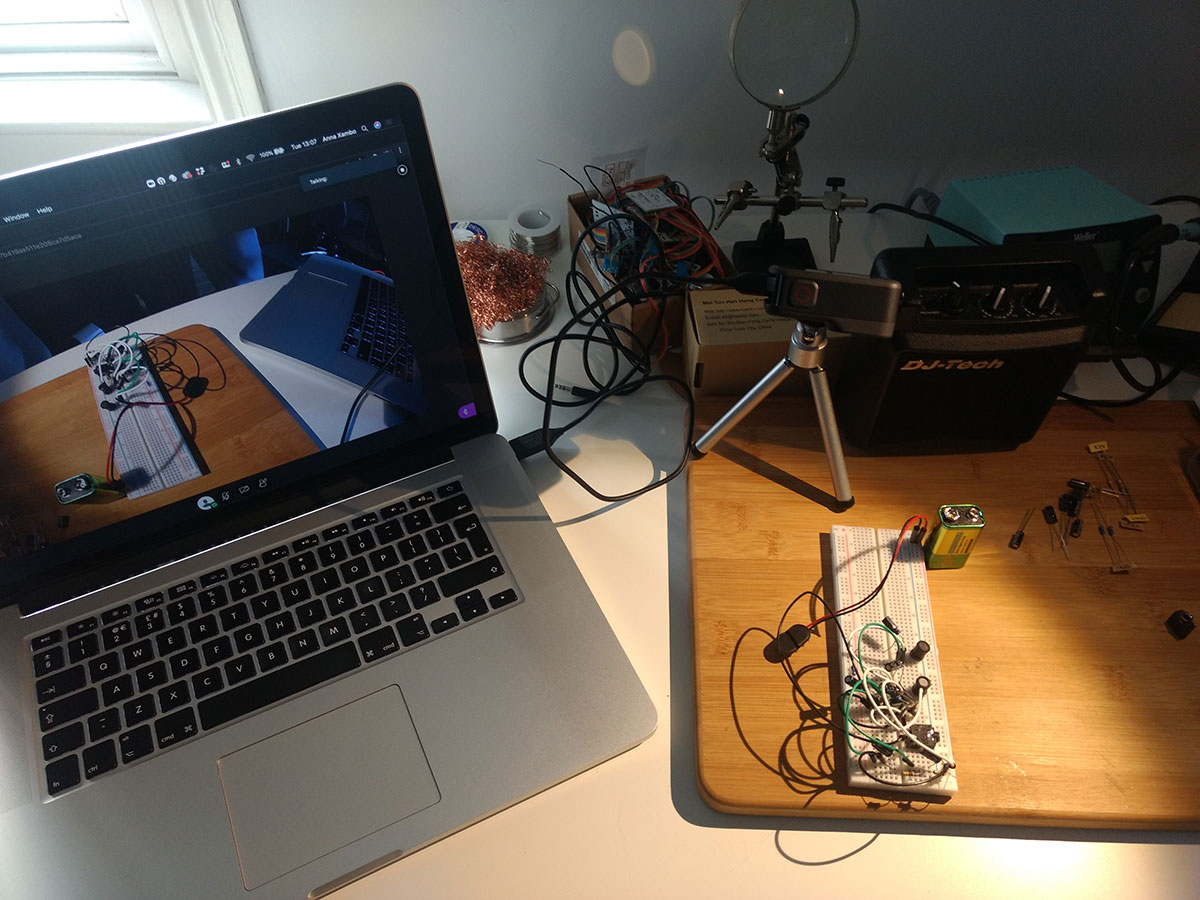
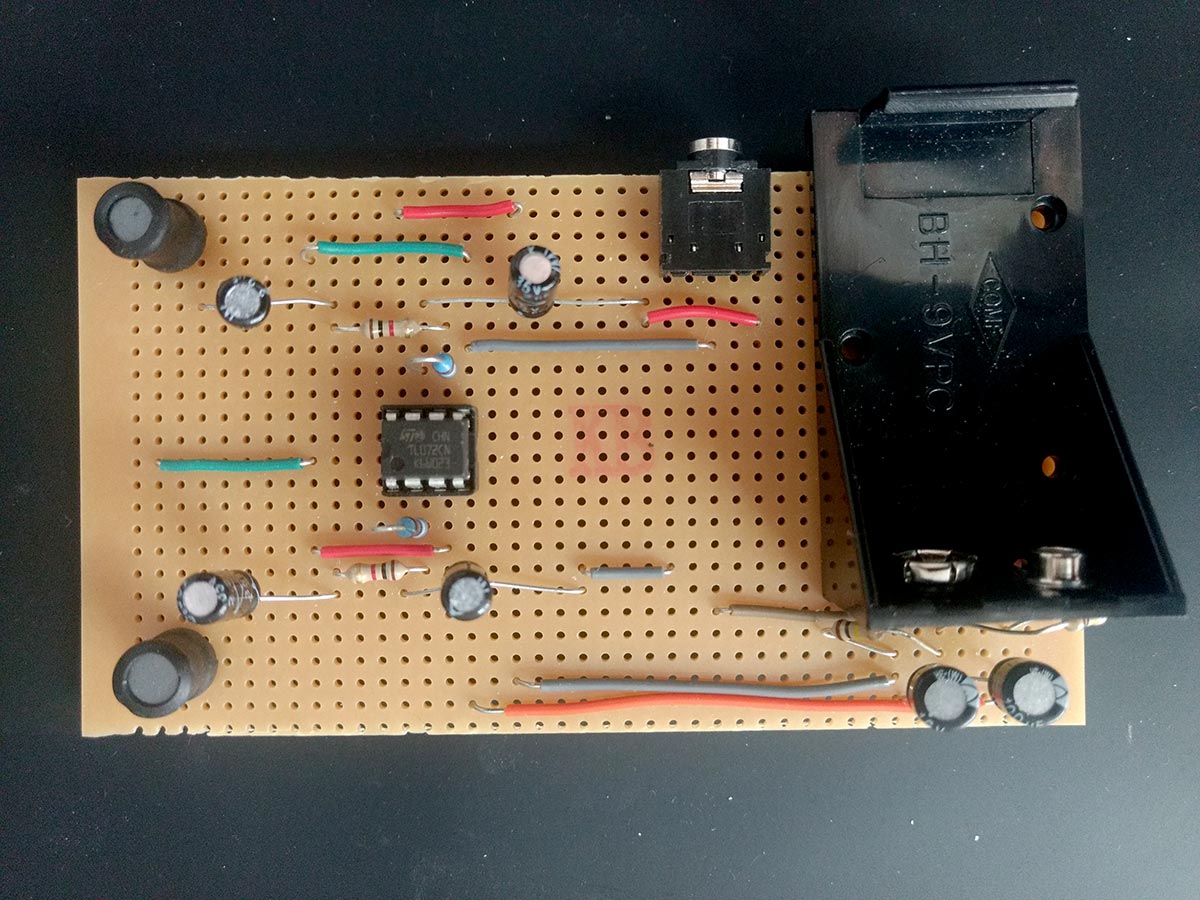
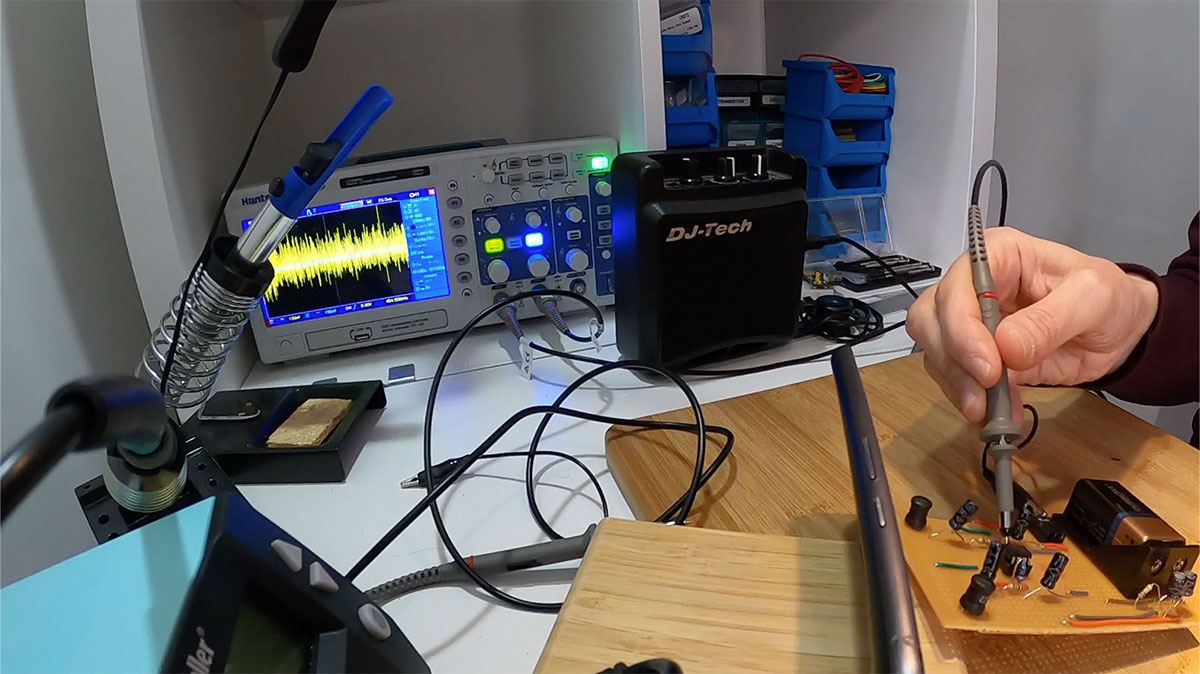
In the other two weeks, we worked with the Elektroslush device, suitable for electromagnetic listening, looking at how to build it during one session (Figures 5 and 6) and how to assemble the kit on perfboard and debug it during a second session (Figures 7–9).
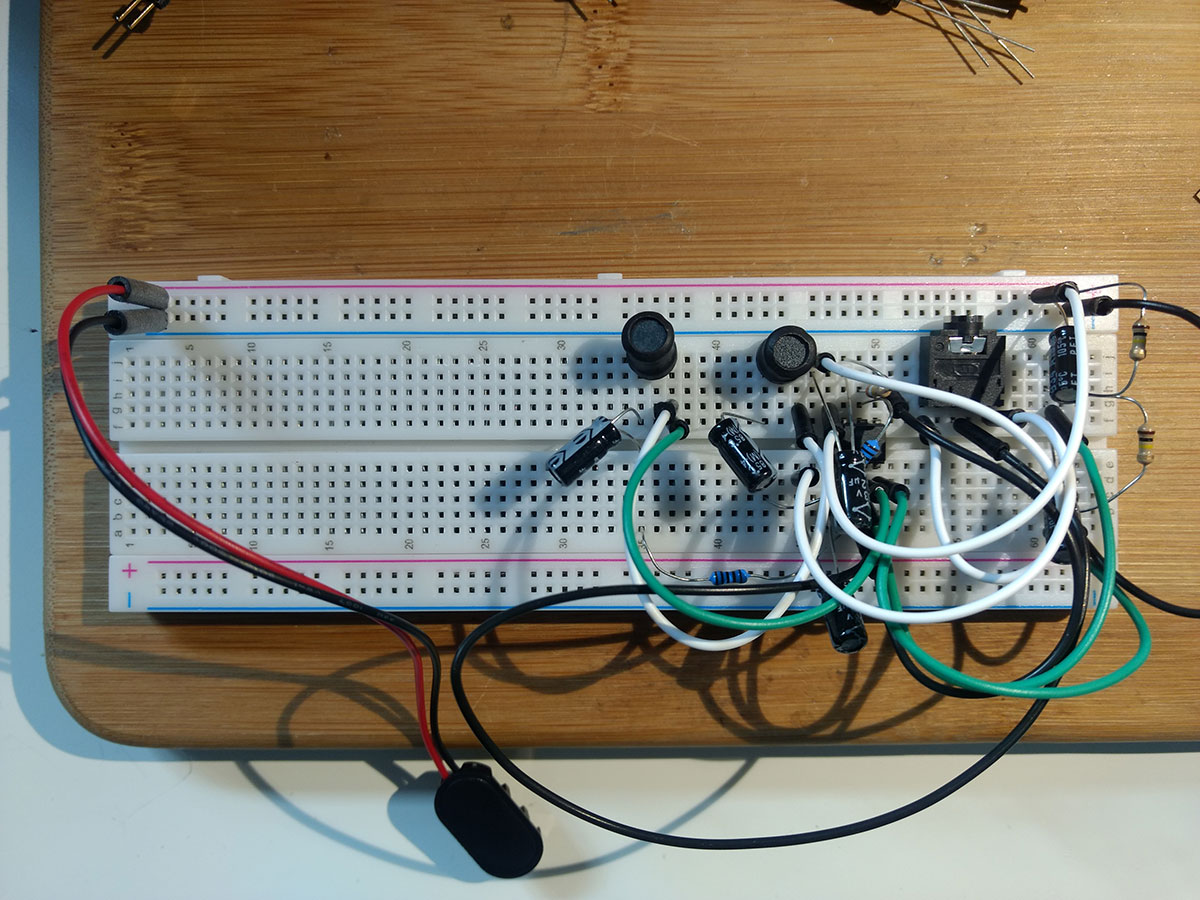

For the activities around the Elektroslush device, the Technical Services (Engineering & Technology) of the Faculty of Computing, Engineering and Media (CEM) of DMU gently prepared and posted an electronic kit to each student enrolled in the module.
During the first lab session with the electronic kit, the students were asked to get familiar with all the components following the inventory list provided, in particular inspecting the model of op-amps. The students were also encouraged to have a webcam during the assemblage of the electronic kit. The results were successful, as most of the students ended with a working kit (only one was unsuccessful due to not having a multimeter for testing why the device was malfunctioning). In the previous year, the students soldered the components on a perfboard and only a few of them were successful!
The main teacher’s and student’s setup is listed next.
Teacher’s Setup
- Headset
- Computer with Blackboard Collaborate
- iPad/tablet connected to Blackboard Collaborate (in my case via Zoom)
- GoPro/webcam for closeup view connected to Blackboard Collaborate (in my case via Zoom)
- Mini-tripod for the GoPro/webcam
- Zoom connected to Blackboard Collaborate
- Multimeter
- Oscilloscope
- Breadboard with the circuit built
- Electronic kit (unassembled)
- Lab worksheet
Student’s Setup
- Headset
- Computer with Blackboard Collaborate
- Webcam (recommended)
- Lab worksheet on their computer / printed
- Electronic kit (unassembled) / Cables (optional)
- Lab worksheet (including inventory list of the electronic kit)
- Multimeter (highly recommended)
Software Labs: Circuit Simulator Software
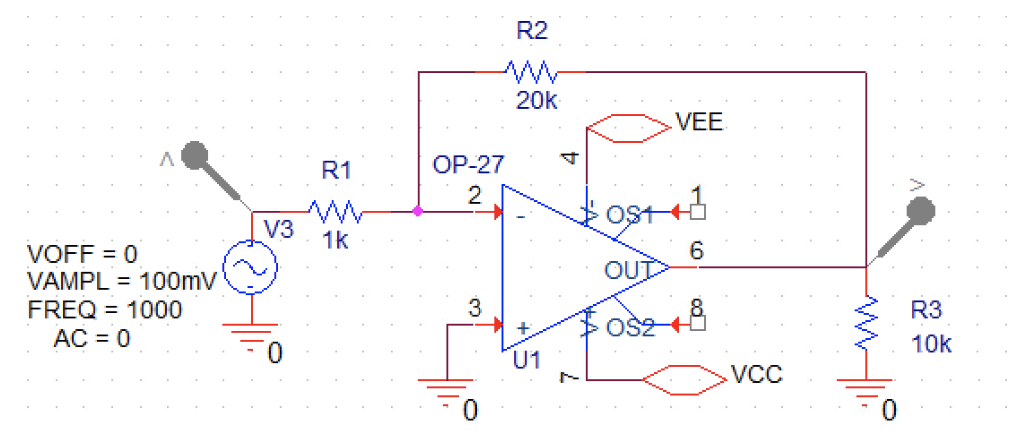
During the following 5 weeks (plus 3 weeks during Easter break in which the students were provided with additional online tutorials), we covered hands-on exercises related to analogue circuit design. This approach is based on the hands-on practice-based model using software. The tutorials were around the Spice circuit simulator and analogue circuit design software OrCAD, which is accessible online to the students using a virtual machine. The students learned how to design their circuits (Figure 10) and conduct different types of analysis (Figure 11) including DC Sweep, AC Analysis, Transient Analysis, Parametric Sweep, Temperature Analysis, and so on.
This was useful for students to see the advantages of using a circuit simulator software, and it also prepared them for the final assignment of the module, which was about using the OrCAD software. In particular, the students were asked to use the schematic editor (Capture) and an analogue/mixed-signal circuit simulator (PSpice) to choose between an existing circuit from the OrCAD suite or a new circuit created from an existing piece of audio electronics (e.g. the Elektrosluch circuit) and to use PSpice modelling techniques to accurately reflect the design’s behaviour that can help to produce a design that will perform under all operating conditions. Several students implemented the Elektroslush circuit from scratch on OrCAD, while others implemented other circuits from basic or seen in class (e.g. a voltage divider, T notch filter) to complex (e.g. the Wien-Bridge oscillator, the astable multivibrator circuit, the big muff guitar pedal) depending on their interests and skills, and were able to run simulation tests and provide critical analysis of the results.
The main teacher’s and student’s setup is listed next.
Teacher’s Setup
- Headset
- Computer with Blackboard Collaborate
- OrCAD
- Lab worksheet
Student’s Setup
- Headset
- Computer with Blackboard Collaborate
- OrCAD
- Lab worksheet
Inventiveness and Opportunities
The teaching style at DMU is aligned with Universal Design for Learning (UDL), which refers to offer flexible ways of teaching and learning as well as giving students an equal opportunity to be successful in their studies. The different types of activities in the online labs are meant to accommodate different types of learning. Offering the materials online is also important for those who cannot or prefer not to attend class. However, there is uniqueness in attending class, given the unique circumstances of working in a group on a shared activity for an agreed period. The use of the online tools helped to smoothly break out the large group into smaller working groups and the workflow from teams to plenary seemed to work well. Given that many students prefer to use their voice only (most of their cameras were turned off) and the sessions were participatory made the sessions similar to a live radio programme.
Blogging was optional in this module and therefore the participation was low (in other audio electronic courses I have included it in the curriculum as a graded activity, hence the participation has been higher). However, this activity was useful to showcase their progress, mainly with the theoretical and hands-on activities, which can also be useful for those who missed the lab session. You can find success stories of using blogging for teaching physical computing in our paper “NIME Prototyping in Teams” (Xambó et al. 2019) and for teaching audio programming in our paper “Learning to Code through Web Audio: A Team-Based Learning Approach” (Xambó et al. 2020).
In last year’s edition of this module, we had two in-class sessions of soldering the Elektroslush device which were very well attended. However, only two students were successful with the completion of the Elektrosluch kit. This year, the students had a prepared kit to be built on a breadboard and most of them were successful. The main reason likely is that we switched from perfboard to breadboard, but the online delivery was also more focused on the 1-1 experience using webcams whenever the students had issues and making sure that all the students were on the same page. The social aspect was also fulfilled with the breakout rooms. It is fair to say that it is possible to deliver a similar collective experience of what a hands-on electronics lab is using online tools only.
The change of the final project from the LINDOS MiniSonic MS20 to the OrCAD software produced certain resistance at the beginning by some students, who thought they were having a downgraded learning experience due to the pandemic. After some sessions were conducted, the students became more convinced about the change because they realised that they were learning a professional simulation circuit software, a technical skill that they can add to their CV. In my opinion, gaining this skill can be more versatile in audio electronics than what they could obtain with the LINDOS device, which is also useful but more specific. Thanks to the technological change that we had to make to suit the online teaching conditions, the students gained in their learning experience.
After the online group lab sessions, there were a few weeks available for students to work on their projects. During this period, I had several online 1-1 meetings with students for their final projects, whilst last year I did have just a few. My impression is that the 1-1 project-led meetings have brought an expanded learning experience to students by discussing topics related to their interests and skills, which also speaks to the UDL concepts promoted by DMU.
Adapting this course online has brought more work for both preparation and delivery. I started to think about this adaptation and suitable tools in May 2020, almost a year ago. Overall, I’m satisfied with the results, even though encountering certain students’ resistance to the module’s changes, mostly related to the final project and the use of OrCAD. I appreciate that the students were patient, believed in the module as I did, we had an ongoing conversation, and now it is rewarding to see the results, and that they succeeded with the module’s expectations. The change has been for the better, I think. An area of improvement for the video recordings of the lectures is that there could be individual quizzes to help them to consolidate the concepts learned.
This course has been discontinued, but next year I will likely be teaching an advanced course in audio electronics on-site. I hope to include the successes of this module. This points to converting it to a hybrid/blended course which can promote more flexibility in accessing and learning the content. This aligns with the present discussion by JISC on “Learning and Teaching Reimagined”, a report that explores the experience of 2020 and how this can help us to improve learning and teaching for the next academic years and 2030. We will also need to contrast this new way of teaching with scientific studies, to fine-tune what works best (e.g. the article “Remote teaching during COVID-19: Implications from a national survey of language educators” reports that it is still an open question how to the ensure positive outcomes for PreK-12 students, for example). For now, the impression is that we managed to adapt this module to the best of our knowledge and capacity to online delivery, we can now compare it with last year’s on-site delivery and, hopefully, we can design an even better module for next year bringing the best of the two worlds.
Acknowledgements
Many thanks to the Technical Services Team (Engineering & Technology) of the Faculty of Computing, Engineering and Media: Manbir Sambhi, Dilip Chauhan, Vishalkumar Pracas and Ashok Karavadra for their constant help and support, especially making sure to carefully prepare and post the electronic kits for both students and teacher amid the pandemic. I am thankful to Gerard Roma for his constant support and advice during the preparation and realisation of the two editions of the module. Also thank you to Eric Chowanietz, Susanne Grunewald, and Manbir Sambhi for their conversations and advice related to teaching audio electronics. Also thank you to Sven-Amin Lembke for coordinating the TECH3011 course practicalities and Peter Batchelor for his general coordinating role. Thank you to DMU ITMS for their constant support during the realisation of the module. Last but not least, many thanks to the students for their active participation in the module.